
Esports Broadcast Setup: What to Test Before Going Live
A live esports broadcast can be disrupted by small faults: an old team logo, a misspelled nickname, a browser source that stopped receiving data, a muted caster channel, or a replay scene linked to the wrong input.
Most can be found before the countdown reaches zero. A structured esports broadcast checklist gives each operator the same reference point and exposes dependencies between systems. In a connected, data-driven workflow, an incorrect match or server selection can affect every graphic or automation that uses the same source data, including the HUD, series score, lower thirds, and post-match graphics.
Confirm the Match and Game Server Setup
Compare the server configuration with the tournament schedule and production rundown. Confirm:
- Correct match, tournament stage, teams, and lobby positions
- Map, game mode, map order, and series format
- Server address, lobby code, or match identifier
- Spectator credentials, observer slots, and broadcast delay
- Game version, tournament ruleset, and server configuration
- Warm-up, ready-state, and match-start procedure
Connect observers and data clients before the public broadcast begins. A connection used in an earlier match may no longer work after a lobby rebuild, server restart, or game update.
Run a brief live-state check. Where the game or server interface exposes this information, confirm the expected teams, player slots, score, and map. If the esports production workflow uses a match ID or server feed, confirm that every connected system points to the active fixture rather than a test match.
Record who can restart the lobby, change the configuration, and grant spectator access. That information should be available during a technical pause without searching through old messages.
Verify Teams, Players, and Match Data
Use one approved source for team and player information. Check it against the latest tournament record:
- Full team names, short names, and current logos
- Player nicknames, capitalization, and special characters
- Player photos, if used
- Starting roster, substitutes, and late changes
- Best-of format, current series score, and tournament stage
- Map order, veto result, or game-mode sequence where relevant
Open every graphic that uses this data. A nickname may fit in a roster panel but overflow in a compact player card. A logo may look correct on a light background and disappear on a dark break screen.
Pay close attention to reused fields. One incorrect abbreviation can appear in the pre-match screen, gameplay overlay, replay bumper, lower third, winner graphic, and post-match recap. Correct the source record instead of patching each template separately.
Keep a short change log for late edits so the producer, graphics operator, observer, and replay operator work with the same roster and match state.
Test the HUD and In-Game Overlay
A static preview can confirm the basic layout, but not live behavior. Test the esports HUD and other broadcast graphics during a practice round or mock game.
Check:
- Team and series scores
- Round, map, phase, and timer information
- Player names, team assignment, and statistics
- Weapons, items, economy, resources, or abilities where relevant
- Logos, side indicators, objectives, pauses, and end states
- Animations and data clearing after resets
- Browser-source connection and refresh behavior
- Resolution, scaling, transparency, and safe zones
Trigger real state changes where relevant and supported: kills, score updates, round transitions, pauses, overtime, reconnects, and map completion. Watch whether values update at the right moment and whether previous data disappears.
Inspect the source inside the final OBS or vMix scene. A graphic can look correct in its own preview but appear cropped, soft, offset, or incorrectly scaled on program output. Reload the browser source once during testing.
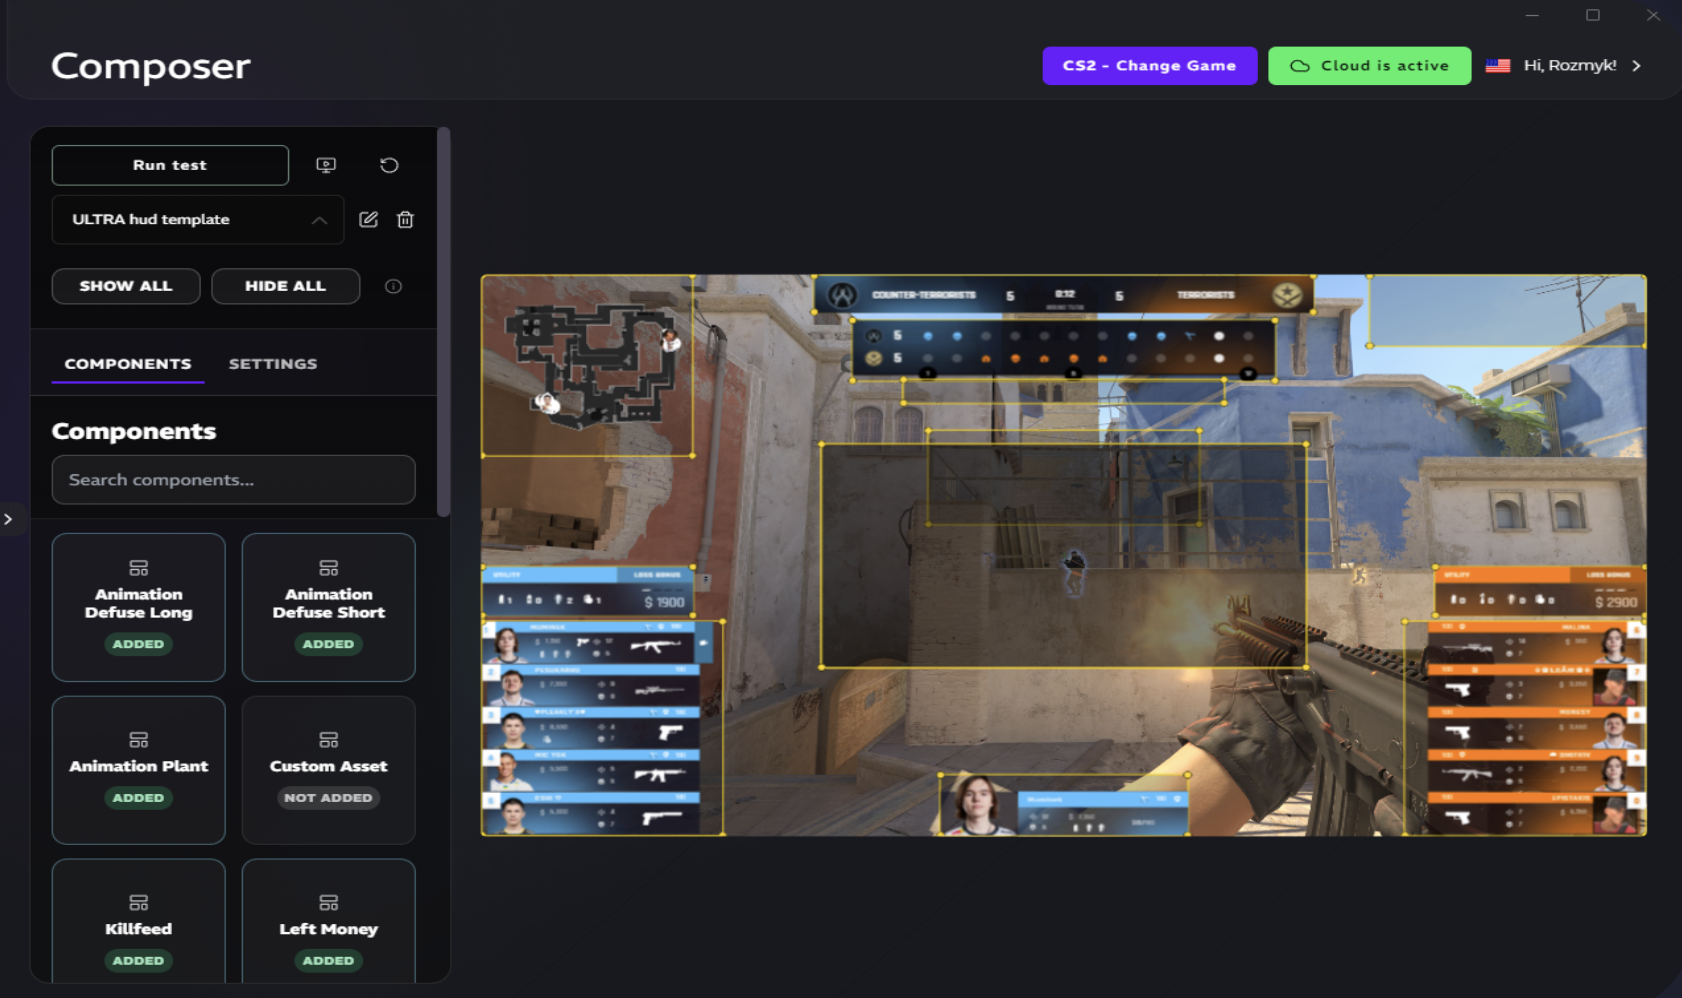
Esports HUDs and can be managed in LHM. For CS2, HUD Composer lets production teams build, preview, and save custom HUD variants in LHM Cloud. Whatever tool is used, test live data, scene placement, output resolution, and recovery after a restart.
Check OBS or vMix Scenes
Compare the scene collection with the run of show. Test every planned scene:
- Gameplay
- Analyst and caster desks
- Player cameras
- Countdown and break screens
- Technical pause
- Replay
- Post-match and winner screens
Switch through them in show order while watching the outgoing program feed. Confirm that each scene contains the correct video input, browser source, logo layer, audio route, and transition.
Look for hidden sources left active, old media files, duplicated audio, and layers carried over from a previous event. The gameplay scene should use the intended observer feed. Desk scenes should not reveal private communication windows or operator interfaces.
Test transitions in both directions. A replay may enter correctly but return to an outdated gameplay scene. Play stingers and media files to the end to confirm what follows them.
Keep a clean technical pause scene and a clean gameplay scene ready for faults involving graphics, cameras, or replays.
Test the Observer Setup
The esports observer controls the audience’s view of the match. Before the show, verify:
- Spectator permissions and server connection
- Keybinds, saved profiles, and player-switching commands
- Free-camera speed and movement
- Map or tactical-view controls
- Observer delay
- Voice communication with the producer
- Cue words for replays, pauses, and desk handoffs
- Backup observer access where available
Run a mock round with fast player switches, free-camera movement, an objective event, and a replay call. The producer should hear each cue and see the chosen feed in the gameplay scene.
Agree on who makes the final call when the observer sees developing action while the producer is preparing a replay or sponsor segment.
Automated observing tools can support production, but the manual path should also be rehearsed. In CS2, Scout Vision, the observer module within Scout AI, can automate POV selection. Enable and test Manual Takeover: a manual player switch disables Scout Vision until the operator turns it on again.
Verify Player Cameras and Additional Video Feeds
Create a feed map for player webcams, team cameras, stage cameras, caster cameras, desk cameras, and remote feeds. For each source, confirm:
- Correct player, caster, team, or desk assignment
- Resolution, frame rate, framing, and exposure
- Connection stability during a longer test
- Synchronization and known latency
- Reconnection after a brief interruption
- Backup feed or camera-free scene
Use source names that match the rundown. Number-only labels are easy to confuse when several remote players reconnect or swap devices.
Check the final crop on the production monitor. A webcam may look acceptable in a call application but become too dark or tightly framed after placement inside a broadcast graphic.
Where LHM Cameras is used for player webcams, test the generated player link from the actual remote network and verify browser permission, player-to-camera assignment, and the green connection indicator in LHM. Confirm that the selected HUD supports Cameras, that the required player identifiers and avatars are present in LHM, and test any configured camera delay. Because the connection is peer-to-peer, symmetric NAT on either side can prevent it from being established. Then check the resulting camera placement in the HUD or, when using Camera Mixer, the PLAYER_CAMS input in the final vMix scene. For broader guidance on collecting and coordinating remote feeds, naming sources, and handing work between operators, see Remote Esports Production: Run Broadcasts Without a Studio.
Perform a Full Audio Check
Test audio at the final program output rather than relying on individual device meters. Check:
- Caster, analyst, and host microphones
- Game audio
- Music, stingers, videos, and replay audio
- Remote guest audio
- Producer, observer, and operator communication channels
- Program, monitoring, and recording levels
Ask each speaker to talk at normal show volume and at a louder level during a major play. Listen for clipping, echo, hum, fan noise, keyboard noise, sudden gain changes, and delayed speech.
Play commentary, game audio, and music together. A channel that sounds fine alone may cover speech in the full mix. Confirm that private communication channels do not reach the public output.
Monitor the outgoing feed through a separate device or return path. Check lip sync on camera feeds and confirm that replay audio enters and exits with the replay scene.
Record a short sample and play it back. The file should contain the expected video, program mix, and any isolated channels required by the production plan.
Check Sponsor and Advertising Assets
Sponsor files often arrive close to show time. Test them as part of the main production pass.
Review:
- Approved sponsor logos and correct variants
- Placement in gameplay, desk, break, and result scenes
- Sponsored segment labels
- Rotating ad order
- Break screens, branded overlays, and replay bumpers
- Display timing, duration, and operator cues
View each asset over moving gameplay. Sponsor elements intended to remain visible during live action should not cover the crosshair, minimap, score, timer, kill feed, objective status, subtitles, or other information used to follow the match. Reserve full-screen ads for planned moments when obscuring gameplay is acceptable.
Confirm whether each placement is scheduled by time, tied to a segment, linked to a game event, or triggered manually. The producer and graphics operator should know which actions happen automatically.
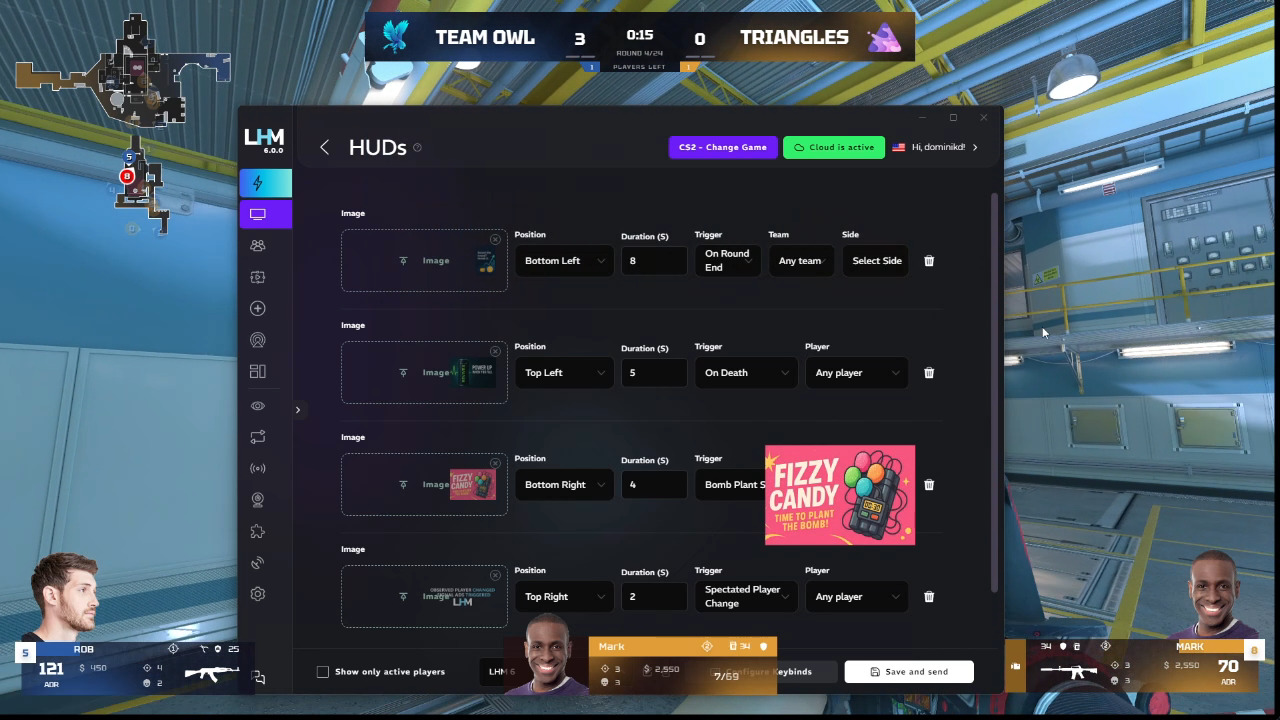
If the production uses LHM Signals Ads, available in LHM Ultra HUDs for CS2, Dota 2, and League of Legends, test each event trigger against a live or simulated game state. Confirm that the intended asset appears in the configured HUD position or full-screen overlay, remains visible for the configured duration, and clears correctly.
Test Replays and Highlights
Start the replay test with simulated gameplay rather than a preloaded clip. Test the whole path:
- Capture from every required input
- In and out points
- Operator controls and shortcuts
- Playback, slow motion, and replay transition
- Replay audio
- Clip naming and highlight bins
- Storage location and available capacity
- Return to the correct live scene
Create a mock play, call the replay over comms, and run it as it would appear on air. Watch for missing audio, wrong camera selection, black frames, delayed cuts, or a return to stale gameplay.
Define when the operator should cancel a replay because live action has resumed. Staying live may be safer than playing a clip that no longer fits the moment.
If post-match clips are part of the plan, open a test export and check its filename, video, and audio before the tournament starts.
For CS2 or Dota 2 productions using LHM Replays, test the complete game-specific path from capture to replay feed and return to live rather than assuming both titles use the same production setup.
Check Production PC Health, Stream Output, and Platform Settings
Compare the encoder or esports broadcasting software settings with the event delivery specification. Confirm:
- Resolution, frame rate, and bitrate
- CPU and GPU load under the most demanding planned scene
- Rendering lag, encoding lag, dropped frames, and network statistics
- Free disk space and recording write performance
- Video and audio encoder
- Stream key or destination credentials
- Correct Twitch, YouTube, or custom destination
- Latency setting
- Program audio source
- Local recording and backup recording
- Stream title, category, and event metadata where used
Run the test with gameplay, browser sources, cameras, replay capture, audio processing, streaming, and local recording active at the same time. Check the production software statistics for rendering lag, encoding lag, network drops, and storage problems.
Send a test output to a private, unlisted, staging, or internal destination where available. Watch the return feed for dropped frames, missing audio, black borders, stale graphics, or unexpected scaling.
Verify the stream key on the machine that will go live, especially when the production company operates several events or channels.
Start and stop both the stream and local recording. Open the saved file afterward. A recording indicator does not prove that the result contains usable video and audio.
Prepare a Backup Plan
Document a clear fallback for every likely failure before the broadcast begins. For each scenario, define who decides to switch, which scene or source goes live, and what the technical team should do to restore the primary workflow.
If the HUD stops updating, switch to clean gameplay or a reduced static graphic while the operator checks the data feed, refreshes the source, and, if necessary, restarts the graphics client. If a browser source fails, use a clean or reduced backup scene or a locally stored static fallback. Reload the source, verify its URL and data connection, and confirm that live values are updating before returning it to the program output.
A game server disconnect should trigger the technical pause scene while the server administrator investigates the problem and the casters receive a clear status update. If the observer loses connection, switch to a backup observer or a fixed spectator feed. Reconnect the primary observer and confirm the correct broadcast delay before switching back.
When a player camera disappears, use a camera-free layout until the feed reconnects and its player assignment is verified. If the replay system fails, remain on live gameplay rather than forcing an unreliable replay. The replay operator can then restart capture or switch to a secondary replay path.
A production PC failure requires a preconfigured secondary production machine or, in a split workflow, a backup encoder. The team should be able to switch to the backup output and quickly verify the program video, audio, and stream delivery. If the internet connection becomes unstable, move to the backup connection, continue local recording, reduce nonessential network traffic, and monitor the outgoing feed.
Keep static team cards, a break loop, a technical pause screen, and a clean gameplay layout stored locally. A secondary operator should know how to access the scene collection, graphics, production notes, and securely stored credentials.
Run a Full Pre-Broadcast Rehearsal
Test the full esports streaming setup in a short mock match using the operators, communication channels, scenes, and output path planned for the show.
The producer should verify the complete chain:
Game server or match instance → observer client → observer video feed → production software
Game server or client data → HUD and overlays → production software
Cameras, microphones, game audio, and media → production software
Production software → encoded stream → stream destination
Production software → local and backup recordings
The rehearsal should include a pre-show scene, team introduction, live gameplay, score change, camera switch, replay, sponsor asset, technical pause, return to gameplay, and winner screen. Stop the stream at the end and check the recording.
Systems may work separately and still fail once connected. A data client can update while the browser layer remains cached. A camera can look correct while its audio route creates an echo. A replay can play correctly but return to the wrong scene.
Record faults in a shared checklist, assign an owner, and rerun the affected sequence after each fix. This repeatable process also helps tournament production teams working across several matches, venues, or operator shifts.
Final Esports Broadcast Checklist
- Match, server, and tournament stage confirmed
- Map, mode, and best-of format verified
- Spectator access and observer slots tested
- Game version and tournament configuration checked
- Team names and logos approved
- Player roster, nicknames, and substitutes verified
- Match data points to the active fixture
- HUD receives live game data
- Scores, timers, stats, and state changes tested
- Browser sources reload correctly
- HUD resolution, scaling, and safe zones checked
- CPU and GPU headroom checked under full production load
- Rendering lag, encoding lag, dropped frames, and network statistics reviewed
- Recording storage and write path verified
- OBS or vMix scenes reviewed
- Scene transitions tested in both directions
- Observer connected with working controls and comms
- Player, stage, caster, and desk cameras assigned
- Camera links, browser permissions, delay, and connection status tested where applicable
- Remote feeds checked for stability and latency
- Final program audio monitored
- Clipping, echo, delay, and missing channels checked
- Sponsor graphics and triggers tested
- Replay capture and playback tested
- Stream destination and credentials verified
- Program and backup recordings enabled
- Technical pause and clean gameplay scenes ready
- Backup connection and operator plan documented
- Full pre-broadcast rehearsal completed
Conclusion
Reliable live esports production depends on preparation across connected systems, operators, and data sources. A standardized esports broadcast setup checklist makes that work easier to repeat across matches, tournaments, and production teams.
LHM can centralize selected data and graphics tasks in this workflow, including player, team, match, and tournament data, as well as HUDs and overlays. It also provides game-specific production modules: supported player-camera workflows, Scout Vision observing automation for CS2, Signals Ads in Ultra HUDs for CS2, Dota 2, and League of Legends, and automated replays for CS2 and Dota 2.